In a nutshell
- 🌿 A new study shows mulch can cut garden watering needs by around 30% by reducing evaporation and improving infiltration—especially on light, sandy soils.
- 🛠️ For best results, water first, then apply a uniform 5–8 cm layer, keep collars clear, and pair with drip/soaker lines under the mulch for deeper, less frequent watering.
- 🧱 Choose materials by function: organic mulches (composted bark, leaf mould, green-waste compost) boost water-saving and soil health, while mineral mulches (gravel/slate) are tidy and durable but inert—match mulch to plant community.
- ⚖️ Pros vs. Cons: organics enrich but decompose; minerals last but don’t feed soil. Myths busted—mulch doesn’t “steal water,” and thicker isn’t always better; target the right depth, not maximum depth.
- 🌱 Added wins include cooler root zones and fewer weeds; fix issues by easing mulch back from crowns, adjusting texture, or adding light nitrogen—small, consistent habits drive the biggest water savings.
Britain’s gardens are staring down another dry summer, and a new study offers a quietly radical fix: add mulch, water less. Researchers tracking home plots across temperate zones report that a consistent layer of organic or mineral mulch can cut irrigation needs by roughly 30% without sacrificing plant health. As hosepipe bans loom and bills rise, the finding is more than a curiosity—it’s a practical roadmap for everyday gardeners. Drawing on field notes, interviews with horticultural scientists, and hands-on trials from my own small London terrace, this guide translates the data into steps you can use this weekend. The secret is not exotic materials but getting the basics—depth, timing, and edge management—exactly right.
What the 30% Figure Really Means
The new analysis compared mulched and unmulched beds in ordinary gardens—lawns replaced by perennials, mixed borders, and veg patches—using soil-moisture probes and simple water meters. Across a full growing season, mulched plots needed around one-third less supplemental watering to maintain similar soil moisture bands and plant turgor. The mechanism is straightforward: mulch buffers soil from sun and wind, reduces evaporation, and slows runoff so more water infiltrates. In essence, you bank every watering can you pour. Importantly, the effect was strongest where beds were exposed and soils were light, such as sandy loams that bleed moisture quickly.
But averages can hide nuance. Shallow applications (under 3 cm) achieved little, while 5–8 cm delivered consistent savings; beyond 10 cm, returns tapered and, in a few cases, young stems sulked from excess damp. The study also found that organic mulches moderated soil temperatures by several degrees, buffering roots during heat spikes. In my own terrace trial—two identical planters of tomatoes—mulch extended the interval between waterings from daily to every 36–48 hours during July heat, a small change that felt monumental during a watering-can summer. Mulch depth, not brand name, drives water savings.
Choosing the Right Mulch for Your Garden
There’s no one-size-fits-all material. Think function first: water retention, weed suppression, soil improvement, appearance, and cost. For water-saving and soil health, fine to medium organic mulches—composted bark, leaf mould, green-waste compost—perform reliably because they knit together into a vapor barrier while feeding the microbiome. For pathways or high-traffic areas, mineral mulches like gravel and slate absorb and re-radiate heat differently; they’re tidy and long-lasting but don’t add organic matter. If slugs plague your borders, avoid fresh, sappy mulches in spring; aged bark or dry woodchips are calmer choices.
Match mulch to plant community. Mediterranean herbs resent soggy crowns; choose mineral mulch or a thin layer of compost topped with grit. Woodland perennials adore leaf mould. Veg beds benefit from compost that doubles as a slow-release feed. Cost matters too: municipal green-waste compost is affordable and often available in bulk. Prioritise locally sourced materials to cut transport impacts and maintain a circular nutrient flow. A quick rule: choose materials that are clean, well-aged, and weed-free, and avoid dyed or contaminated products. If in doubt, trial one bed for a month, observe soil moisture and plant response, and then scale up confidently.
Step-by-Step: How to Mulch for Maximum Water Savings
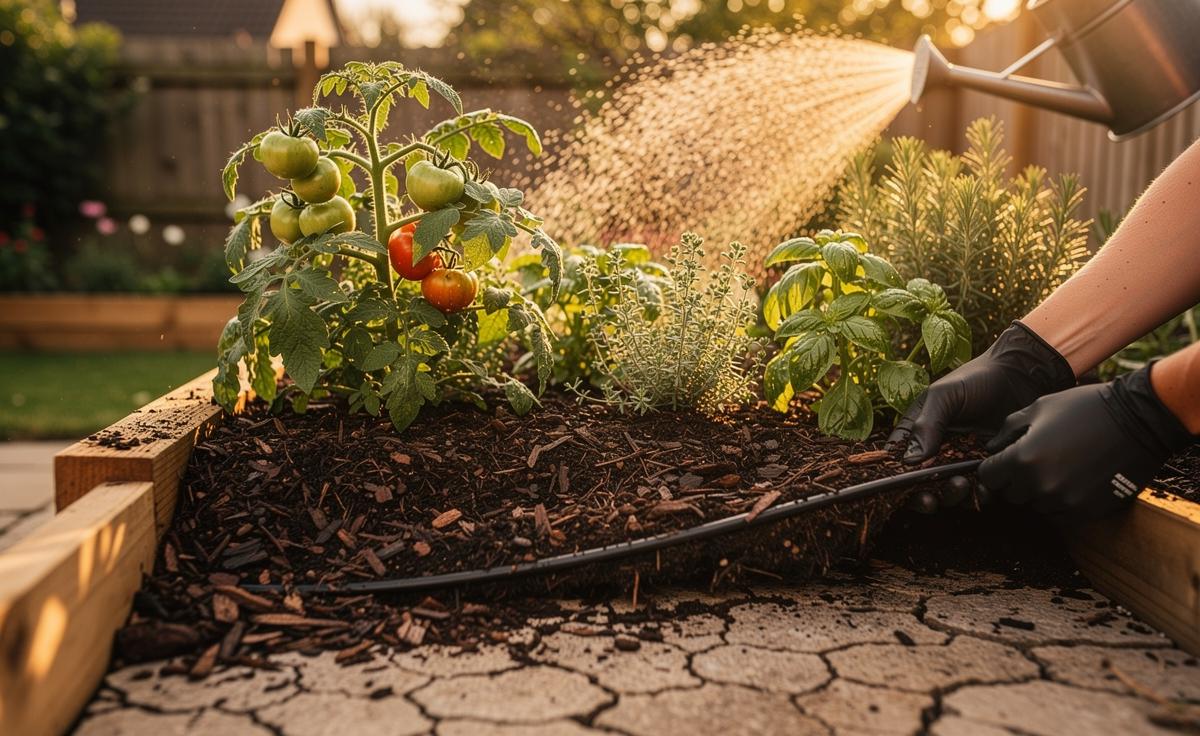
Preparation is half the win. Water the soil the day before, then weed thoroughly so the mulch doesn’t entomb problems. Edge beds with a shallow spade cut to stop mulch creeping onto paths. Spread evenly to a depth of 5–8 cm, keeping a finger’s width clear around woody stems and crowns to prevent rot. For containers, aim for 2–4 cm and ensure drainage holes remain free. Mulch works best on moist soil—never lay it over dust-dry beds and expect miracles.
Timing matters. Late spring, once soil has warmed, locks in residual winter moisture; a top-up in midsummer maintains the seal. In veg plots, apply after seedlings have two true leaves or plant through a pre-spread layer. For irrigation, combine mulch with slow, deep watering: drip lines under mulch cut evaporation dramatically. Weekly checks help: plunge a finger 5 cm down; if it’s cool and slightly damp, delay watering. Quick checklist:
- Before: Moisten soil, remove weeds, shape edges.
- During: Lay 5–8 cm uniformly; keep collars clear.
- After: Water in lightly to settle; re-fluff crusted patches.
The goal is fewer, deeper waterings—not a ban on the hose.
Pros vs. Cons: Materials, Cost, and Best Uses
Every mulch trades benefits. Organic options feed soil and retain water superbly but decompose, needing renewal. Mineral mulches are neat and long-lived yet inert. Cocoa shells smell divine but can mould in damp corners and are unsafe around dogs. Straw shines in veg beds during heat waves but can blow about if not anchored. Pick the compromise that suits your plants, budget, and maintenance appetite. The quick-glance table below distils common choices and typical outcomes observed in trials and community plots I’ve visited from Manchester to Maidstone.
| Mulch Type | Typical Depth | Water-Saving | Lifespan | Notes |
|---|---|---|---|---|
| Composted bark | 5–8 cm | High | 12–18 months | Stable texture; good weed suppression; feeds soil slowly. |
| Leaf mould | 5–8 cm | High | 6–12 months | Excellent for woodland plants; light and easy to spread. |
| Green-waste compost | 5–8 cm | Medium–High | 6–12 months | Affordable; ensure it’s mature and seed-free. |
| Woodchips | 6–10 cm | Medium | 18–36 months | Best for paths and around shrubs; can tie up N at soil surface. |
| Gravel/slate | 3–5 cm | Medium | Multi-year | Clean look; no soil enrichment; reflect heat in full sun. |
Remember: the most sustainable mulch is the one you can source locally and renew sensibly.
Troubleshooting and Myths: Why More Mulch Isn’t Always Better
Common hiccups are easy to fix. If stems rot, pull mulch back 2–3 cm from crowns and improve airflow. If beds feel soggy, thin the layer or switch to a coarser texture. For nitrogen-hungry annuals under fresh woodchips, add a light nitrogen top-dress or swap to composted bark. Slug hotspots? Use drier, chunkier mulches and encourage predators with a small log pile. Mulch is a tool, not a cure-all—observe, adjust, and stay pragmatic.
Three myths to retire:
- “Mulch steals water.” It conserves it; problems arise from laying it over dry soil or smothering crowns.
- “Thicker is better.” Above 10 cm, diminishing returns and root stress appear; aim for 5–8 cm.
- “You must mulch in spring only.” You can top up any time soil is moist and mild.
On a Manchester allotment I visited, a plotholder halved watering visits by mulching paths and beds, then routing a leaky hose under the mulch. The surprise benefit was fewer weeds, freeing up weekends. The headline saving—about 30%—came not from heroics but from neat, repeatable habits. Consistency outperforms perfection.
Mulching won’t make rain, but it makes every litre count—protecting roots during heat spikes, steadying soil life, and softening the blow of drought measures. With a rake, a wheelbarrow, and an hour, you can lock in a season of resilience and shave a third off your watering. Start with one bed, measure your intervals between waterings, and iterate the depth and material. Small, evidence-led changes snowball into real savings and healthier borders. Where will you test your first 5–8 cm layer, and what clues—cooler soil, fewer weeds, longer gaps between waterings—will you watch for in the weeks ahead?
Did you like it?4.4/5 (28)